How to Set Up PPPoE on a Zen Internet Connection Supplied via CityFibre
Update July 2025
The guide below remains valid, but our journey continued! We upgraded to a 10 GbE network card and transitioned our Zen PPPoE connection to OpenWrt for maximum performance. Details and configuration are included in the errata at the end of this article, should you wish to achieve full Zen Fibre Max speeds with modern hardware.
Introduction
Modern fibre broadband promises ultra-fast speeds and simple Ethernet plug-and-play. Yet many UK fibre connections—including Zen’s Full Fibre service over CityFibre—arrive via PPPoE tunnels, adding surprising complexity. This guide explains how to set up PPPoE on Zen Internet’s service and why even high-end hardware may struggle to deliver full 2.35 Gbps speeds without specialised network cards.
This article aims to be a practical, real-world record of our setup experience—warts and all—to help anyone building a custom router for Zen over CityFibre.
Why PPPoE Instead of Pure Ethernet?
At first glance, full fibre seems like it should just provide Ethernet: you plug in, get an IP address, and surf at gigabit or multi-gigabit speeds. So why PPPoE?
- Subscriber Authentication — PPPoE allows Zen (or other ISPs) to control who’s allowed to use the line, rather than simply relying on physical line provisioning.
- IP Address Management — Many ISPs conserve IPv4 addresses by assigning them dynamically via PPPoE rather than routing static subnets directly.
- Legacy Network Integration — PPPoE fits into ISPs’ existing billing and session systems originally designed for DSL broadband.
CityFibre hands off residential services via VLAN 911, over which Zen establishes a PPPoE session. Unfortunately, PPPoE encapsulation adds CPU overhead, limiting achievable speeds on software-only routers.
SOGEA vs PPPoE
SOGEA (Single Order Generic Ethernet Access) is a wholesale product that eliminates the need for a traditional phone line while delivering broadband. However, it’s not a protocol. It’s merely how the fibre line is provisioned. Even under SOGEA, Zen still uses PPPoE as the session protocol for authenticating customers and allocating IP addresses.
So, SOGEA is the service type; PPPoE is the mechanism used to run your internet session over that service.
In short:
✅ SOGEA = the physical fibre connection.
✅ PPPoE = the method used to authenticate and route your internet traffic over that connection.
Hardware Performance Limits
Our lab tested Zen’s 2.35 Gbps symmetrical service on several machines:
- Intel Xeon E5-2683 v4 (32 threads)
- Topped out around ~1 Gbps down / 500 Mbps up.
- Intel i9-13900K
- Managed ~1.7 Gbps down / 800 Mbps up.
Despite beefy CPUs, neither system could fully saturate the Zen connection due to the CPU cost of software-based PPPoE handling. Hardware offload and NIC features make a massive difference.
Why Multi-Queue NICs Matter
Network Interface Cards (NICs) with multiple hardware queues allow traffic to be split across multiple CPU cores. This is crucial because PPPoE sessions can become bottlenecks if handled in a single queue on one core.
Our tests showed:
✅ NICs with at least 8 TX/RX queues help spread the load.
❌ Consumer Realtek 2.5GbE NICs like the RTL8125 choke above ~1 Gbps.
✅ High-end Intel NICs (e.g. X540-T2, X550-T2) can handle multi-gigabit PPPoE with hardware offload and support multiple queues.
The difference is dramatic. With a good NIC, your CPU simply has far less work to do.
Setting Up PPPoE on Linux
Here’s how we manually configured Zen’s PPPoE connection on Arch Linux. Other distributions follow similar logic, though paths and package names may vary.
Check for Required Packages
On Arch:
pacman -S rp-pppoe ppp pppusage
On Debian/Ubuntu:
apt install ppp pppoe pppoeconf
These provide the PPP daemon (pppd), user-space PPPoE tools, and utilities for monitoring connections.
Load Kernel Modules
Most modern kernels auto-load PPPoE modules, but to be safe:
Create /etc/modules-load.d/ppp.conf:
ppp_generic
ppp_async
pppoe
slhc
Configure Base Ethernet Interface
/etc/systemd/network/ens6.network:
[Match]
Name=ens6

[Network]
# No static address here; VLAN comes next.
Create VLAN Device for Zen (VLAN 911)
/etc/systemd/network/ens6.911.netdev:
[NetDev]
Name=ens6.911
Kind=vlan

[VLAN]
Id=911
Configure VLAN Interface
/etc/systemd/network/ens6.911.network:
[Match]
Name=ens6.911

[Network]
LinkLocalAddressing=no
Define PPPoE Session
Zen provides static IPv4 allocations. Example configuration:
/etc/systemd/network/pppoe.network:
[Match]
Name=ens6.911

[Network]
Address=217.155.241.54/30
Gateway=217.155.241.53
DNS=51.148.1.1
LinkLocalAddressing=no

[PPPoE]
Username=zen999999@zen
Password=thePassWord

[IPCP]
AcceptDNS=yes
Zen allocates:
- Network: 217.155.241.52/30
- Usable: 217.155.241.53 – 217.155.241.54
- Broadcast: 217.155.241.55
PAP/CHAP Secrets
/etc/ppp/chap-secrets:
"zen999999@zen" * "thePassWord" *
Manual PPPoE Peer Configuration
/etc/ppp/peers/zen-pppoe:
debug
pty "/usr/sbin/pppoe -I ens6.911 -T 80 -m 1412"
user "zen999999@zen"
noauth
persist
maxfail 0
mtu 1492
mru 1492
usepeerdns
defaultroute
replacedefaultroute
linkname zen-pppoe
ipparam zen-pppoe
Start the connection:
pppd call zen-pppoe
Monitor:
pppstats
pppusage
Manually Bringing Down the Connection
Stop the PPPoE session with:
killall pppd
Or disable the relevant systemd unit if running automatically.
Testing Performance
Test your link directly on PPPoE:
speedtest --interface=ppp0
Check negotiated NIC speed:
ethtool ens6
Expect:
Speed: 2500Mb/s
Duplex: Full
We found:
- eero 7 Max router reliably achieved ~2.35 Gbps symmetrical.
- DIY Linux routers plateaued well below that due to PPPoE CPU load.
Errata:
Upgrading to OpenWrt and 10 GbE
Since writing this guide, we’ve refined our setup considerably:
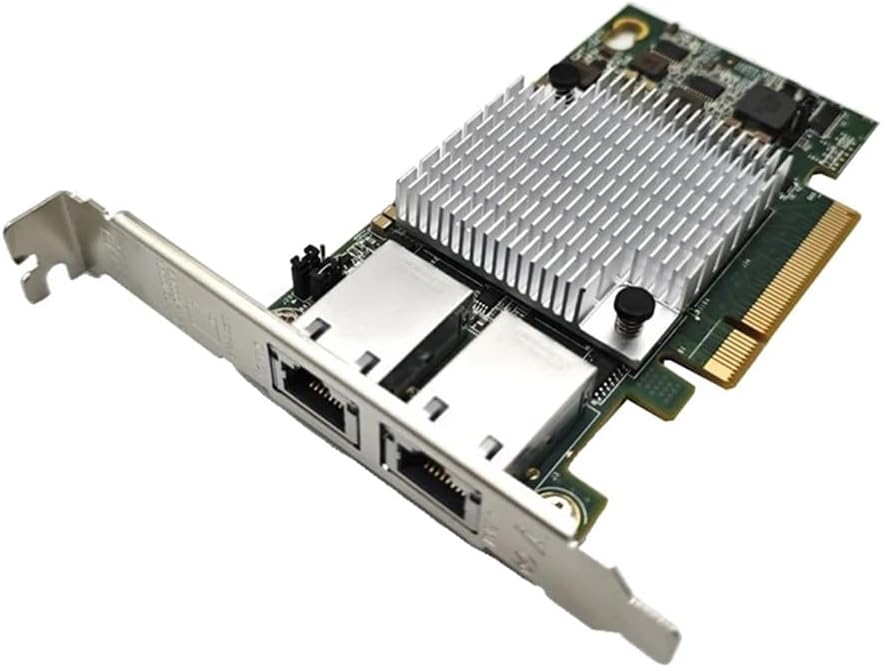
- We invested in a T540-T2 10 GbE NIC from Amazon, at a bargain £15.17 (£18.21 incl. VAT). The card gets extremely hot — hot enough to cremate an egg — so we mounted a 40 mm fan to the heatsink for safe operation.
- We tested OPNsense first, and while we love its interface, the kernel drivers only managed ~1 Gbps up/down. We therefore switched to OpenWrt 24.10.2 r28739-d9340319c6 with LuCI from the openwrt-24.10 branch.
- Our hardware: an old Dell Vostro 3470, Intel Core i5-8400 @ 2.80 GHz with 32 GB DDR4, the 10 GbE NIC, plus an RTL8125 2.5 GbE NIC for LAN. The whole box cost £70 total (£50 for the Vostro from a local used office equipment supplier).
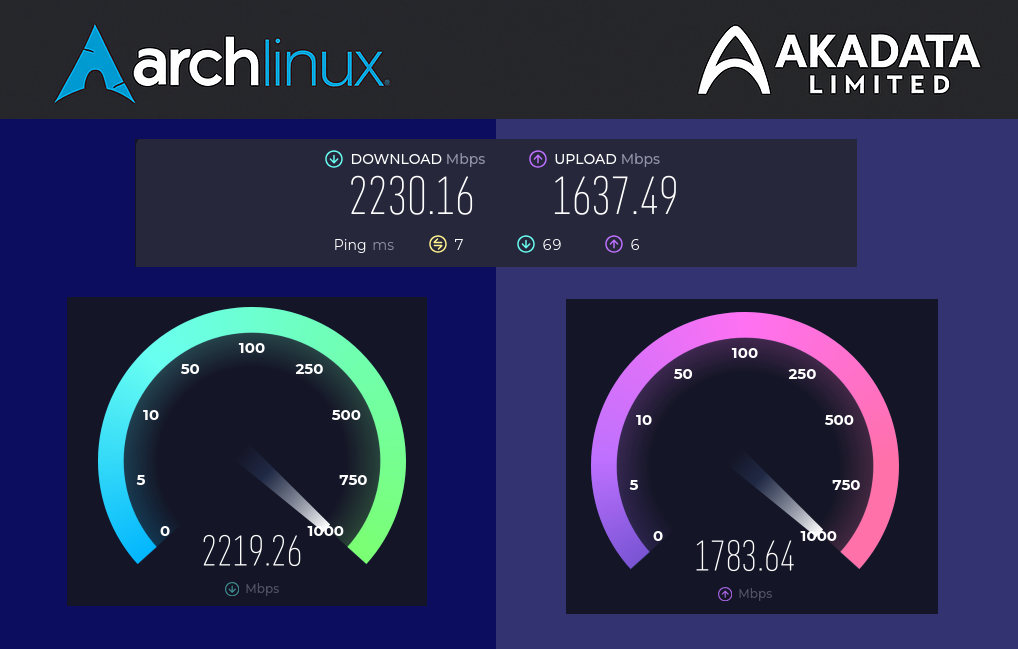
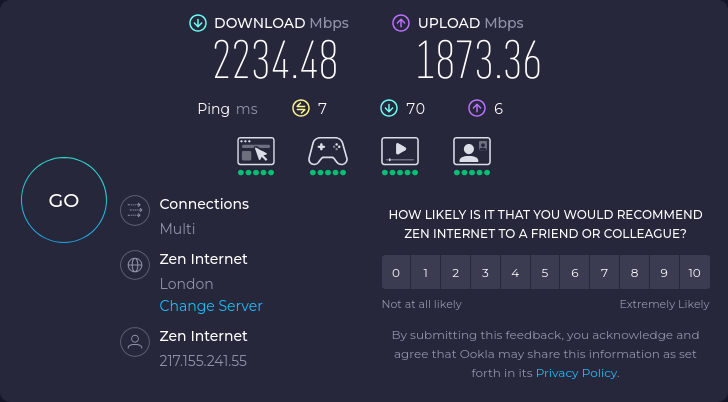
With this setup, we achieved the full advertised 2.35 Gbps/2.35 Gbps Zen Fibre Max speeds and can finally route our IPv6 /64 and /48 allocations properly across the network — no more relying on ULAs or link-local addresses. It’s proper networking, done properly, for a fraction of the cost of commercial solutions.
Packages you will want to install on OpenWRT
kmod-igb - 6.6.93-r1
kmod-ppp - 6.6.93-r1
kmod-pppoe - 6.6.93-r1
kmod-pppox - 6.6.93-r1
luci-proto-ppp - 25.186.44806~9ceef01
ppp - 2.5.1-r1
ppp-mod-pppoe - 2.5.1-r1
luci-proto-ipv6 - 25.186.44806~9ceef01
Below is the relevant configuration snippet from /etc/config/network on OpenWrt for reference:
config interface 'loopback'
    option device 'lo'
    option proto 'static'
    option ipaddr '127.0.0.1'
    option netmask '255.0.0.0'

config globals 'globals'
    option ula_prefix 'fd12:cafe:f00d::/48'
    option packet_steering '1'
    option steering_flows '128'

config device
    option name 'br-lan'
    option type 'bridge'
    list ports 'eth1'

config interface 'lan'
    option device 'br-lan'
    option proto 'static'
    option ipaddr '192.168.4.254'
    option netmask '255.255.255.0'
    option ip6assign '60'
    option macaddr 'ca:fe:c0:ff:ee:e0'

config interface 'vmb-wan'
    option device 'eth0'
    option proto 'static'
    option ipaddr '80.194.xxx.xxx'
    option netmask '255.255.255.248'
    option gateway '80.194.xxx.xxx'
    list dns '1.1.1.1'

config interface 'vlan911'
    option device 'br-vlan911'
    option proto 'none'

config interface 'zen_pppoe'
    option proto 'pppoe'
    option device 'eth2.911'
    option username 'zenXXXXX@zen'
    option password 'Pa55W0rd'
    option ipv6 'auto'
    option ifname 'eth2.911'
    option force_link '1'
    option ip6assign '64'
We hope this helps others push their Zen connections to the limit! It turned out to be surprisingly simple—although that simplicity took three long days and many nights of testing, diagnosis, and learning. In the end, it just worked beautifully with OpenWrt.
The Network Configuration
root@OpenWrt:/etc/config# ip ad ls
1: lo: <LOOPBACK,UP,LOWER_UP> mtu 65536 qdisc noqueue state UNKNOWN qlen 1000
link/loopback 00:00:00:00:00:00 brd 00:00:00:00:00:00
inet 127.0.0.1/8 scope host lo
valid_lft forever preferred_lft forever
inet6 ::1/128 scope host
valid_lft forever preferred_lft forever
2: eth0: <BROADCAST,MULTICAST> mtu 1500 qdisc fq_codel state DOWN qlen 1000
link/ether e4:54:e8:aa:df:36 brd ff:ff:ff:ff:ff:ff
inet 80.194.xx.xx/29 brd 80.194.154.231 scope global eth0
valid_lft forever preferred_lft forever
3: eth1: <BROADCAST,MULTICAST,UP,LOWER_UP> mtu 1500 qdisc fq_codel master br-lan state UP qlen 1000
link/ether c0:a1:c3:a3:f1:11 brd ff:ff:ff:ff:ff:ff
4: eth2: <BROADCAST,MULTICAST,UP,LOWER_UP> mtu 1500 qdisc mq state UP qlen 1000
link/ether 6c:92:bf:67:bc:8c brd ff:ff:ff:ff:ff:ff
inet6 fe80::6e92:bfff:fe67:ba17/64 scope link
valid_lft forever preferred_lft forever
5: eth3: <BROADCAST,MULTICAST> mtu 1500 qdisc noop state DOWN qlen 1000
link/ether 6c:92:bf:67:bc:8d brd ff:ff:ff:ff:ff:ff
6: br-lan: <BROADCAST,MULTICAST,UP,LOWER_UP> mtu 1500 qdisc noqueue state UP qlen 1000
link/ether c0:a1:c3:a3:f1:11 brd ff:ff:ff:ff:ff:ff
inet 192.168.4.254/24 brd 192.168.4.255 scope global br-lan
valid_lft forever preferred_lft forever
inet6 fd60:36ee:1971:3511:c2a1:c3ff:fea3:f111/64 scope global dynamic flags 100
valid_lft 1771sec preferred_lft 1771sec
inet6 2a02:8012:ba17::1/60 scope global dynamic noprefixroute
valid_lft 79039sec preferred_lft 79039sec
inet6 fd12:cafe:f00d::1/60 scope global noprefixroute
valid_lft forever preferred_lft forever
inet6 fe80::c2a1:c3ff:fea3:f111/64 scope link
valid_lft forever preferred_lft forever
7: eth2.911@eth2: <BROADCAST,MULTICAST,UP,LOWER_UP> mtu 1500 qdisc noqueue state UP qlen 1000
link/ether 6c:92:bf:67:bc:8c brd ff:ff:ff:ff:ff:ff
inet6 fe80::6e92:bfff:fe67:ba17/64 scope link
valid_lft forever preferred_lft forever
8: pppoe-zen_pppoe: <POINTOPOINT,MULTICAST,NOARP,UP,LOWER_UP> mtu 1492 qdisc fq_codel state UNKNOWN qlen 3
link/ppp
inet 217.155.xx.xx peer 51.148.xx.xx/32 scope global pppoe-zen_pppoe
valid_lft forever preferred_lft forever
inet6 2a02:8012:ba17:10::1/64 scope global dynamic noprefixroute
valid_lft 79039sec preferred_lft 79039sec
inet6 2a02:8011:d017:abc1::1/64 scope global dynamic noprefixroute
valid_lft 2591891sec preferred_lft 604691sec
inet6 fd12:cafe:f00d:10::1/64 scope global noprefixroute
valid_lft forever preferred_lft forever
inet6 fe80::1/128 scope link flags 02
valid_lft forever preferred_lft forever
Route table
root@OpenWrt:/etc/config# ip route
default via 51.148.xx.xx dev pppoe-zen_pppoe
51.148.xx.xx dev pppoe-zen_pppoe scope link  src 217.155.241.55
192.168.4.0/24 dev br-lan scope link  src 192.168.4.254
Testing Your Pipe
To verify the real performance of our connection, we created a parallel download script to hammer the line and we opened multiple speedtest tabs and ran them parralel with the bandwidth test runing on the OpenWT Router and a seperate workstation. We strongly recommend testing your PPPoE link under load to confirm it can sustain Zen’s advertised speeds. This ensures your hardware and tuning are up to the job. The script spawns multiple simultaneous downloads from fast mirrors like Hetzner speed-test servers, giving an excellent measure of real-world throughput.
dl_test.sh Script to run on OpenWRT Router
#!/bin/bash

# Define an associative array of Hetzner test endpoints and filenames
declare -A endpoints=(
  ["nbg1"]="https://nbg1-speed.hetzner.com/10GB.bin"
  ["fsn1"]="https://fsn1-speed.hetzner.com/10GB.bin"
  ["hel1"]="https://hel1-speed.hetzner.com/10GB.bin"
  ["ash"]="https://ash-speed.hetzner.com/10GB.bin"
  ["hil"]="https://hil-speed.hetzner.com/10GB.bin"
  ["sin"]="https://sin-speed.hetzner.com/10GB.bin"
)

# Loop over each endpoint
for name in "${!endpoints[@]}"; do
  url="${endpoints[$name]}"
  (
    mkdir -p "downloads_$name"
    echo "Starting download from $name..."
    curl -L --progress-bar "$url" -o "downloads_$name/10GB_${name}.bin"
    echo "Finished download from $name."
  ) &
done

wait

echo "✅ All parallel downloads complete."


rm downloads_ash downloads_fsn1 downloads_hel1 downloads_hil  downloads_nbg1 -r
Conclusion
PPPoE on Zen’s CityFibre service is absolutely achievable—but reaching full 2.35 Gbps takes careful hardware choices and plenty of patience. A multi-queue NIC and hardware offload are essential; even strong CPUs alone can’t cope. Zen support remains helpful, but gaps around static IPv6 and router capabilities can add frustration.
For those who want full control, DIY routing is entirely possible. Just be prepared to spend time testing, reading logs, and picking the right network cards. Once dialled in, it’s solid—and fast!
For those that would like a 10G Dual Port NIC for less than £20 here is the link, we cant touch the price so we wont try to sell you what you can find for a more cost effective price elsewhere https://www.amazon.co.uk/dp/B0DZ6QFPWT
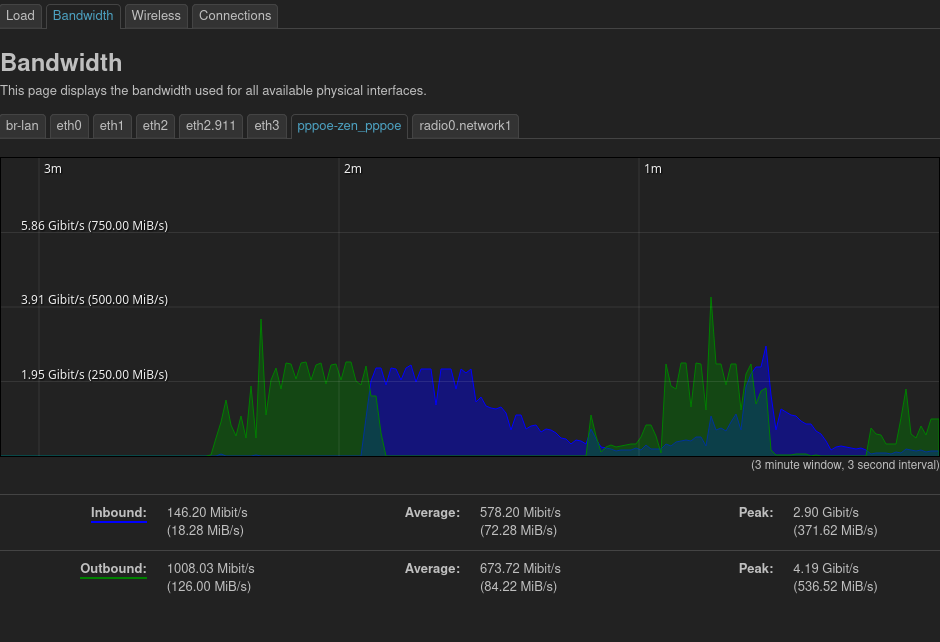
Additional Note on Upstream Speeds
Interestingly, during testing, we observed that our outbound (upload) speeds were not capped as strictly as expected. In some cases, peaks above 4 Gbit/s were recorded on the WAN interface despite the nominal 2.35 Gbps service rate. This may be transient bursts or measurement quirks, but it’s encouraging to see headroom available, especially for short-lived upload spikes.
Stay tuned at articles.akadata.ltd for updates as we benchmark different hardware and configurations.